AND ITS MANAGEMENT
INCLUDING
FULL PRACTICAL DIRECTIONS FOR PRODUCING THE LIME
LIGHT, MAKING OXYGEN GAS, AND PREPARING
LANTERN SLIDES
BY
T. C. HEPWORTH
LATE LECTURER ON SCIENCE TO THE ROYAL POLYTECHNIC
INSTITUTION, LONDON.
London
CHATTO AND WINDUS, PICCADILLY
1885
[All rights reserved]
PREFACE.
During the past few years, the introduction of a dry-plate photographic process of such a nature that it can be practised successfully by amateurs of both sexes has aroused an amount of interest in the camera and its capabilities, such as few scientific instruments can command. The Magic Lantern is now closely allied with the camera, for there is no means of showing the perfection of a photographic picture so well as by its aid. But many persons are deterred from adopting the latter contrivance because they fancy that there must be innumerable difficulties to surmount before they can hope to master its management. It is for these that the following pages have been written, in which I have tried to place clearly before the reader what can be done, and how to do it. I have also tried to indicate the educational value of the lantern, and have pointed out in a necessarily brief manner how various branches of knowledge can be illustrated by its aid. The numerous personal inquiries addressed to me after my lectures, and the numbers of letters constantly received, asking for information regarding the lantern, its management, and the preparation of lantern slides, have convinced me that there is room for a manual, humble though it be, dealing with these subjects.
T. C. Hepworth.
32, Cantlowes Road,
London, N.W.
CONTENTS.
| The History of the Magic Lantern. | |
| PAGE | |
| The introduction of mineral oil lanterns.—The advance caused by the aid of photography.—The optical system of a modern lantern.—Educational value of the lantern | 1-12 |
| The Lime-Light. | |
| Different forms of lime-jets.—Precautions to be observed in their use | 12-16 |
| Dissolving Views. | |
| The old method and the new.—The biunial lantern.—The dissolving-tap and its management.—Coincident discs.—‘Effects’—The application of the double lantern to spectrum analysis | 17-22 |
| Making Oxygen Gas. | |
| Necessary precautions.—The purifier.—Explanatory diagram.—Practical details.—The retort.—The gas-bag.—Iron bottle for compressed gas.—Pressure-boards.—Lime cylinders | 22-33 |
| The Screen or Sheet. | |
| Arrangement adapted to a sitting-room.—Public exhibitions.—Method of hanging a large sheet.—Sheets on frames | 33-37 |
| Pictures for the Lantern. | |
| Photographic slides.—Home-made pictures.—Drawing pictures on ground-glass.—The slide-painter’s easel.—Mounting slides | 37-43 |
| On the Colouring of Photographic Transparencies. | |
| The process described.—Oil-colours employed.—Apparatus required.—Mixed tints.—How to lay on the colour.—Finishing touches.—Painting in water-colours | 43-55 |
| Showing Solid and Opaque Objects on the Lantern Screen. |
|
| Chadburn’s opaque lantern.—The aphengescope.—Showing coins, medals, etc.—The opaque lantern in a law court.—The physioscope | 56-61 |
| The Lantern Microscope. | |
| Photographic microscopic slides.—The solar microscope.—A sketch lecture | 61-65 |
| Mechanical or Moving Pictures. | |
| Comic slips.’—Beale’s choreutoscope.—The dancing skeleton | 66-69 |
| Concluding Remarks. | |
| The management of the lantern in public.—Signals between lecturer and operator | 70-75 |
[Pg 1]
AND ITS MANAGEMENT.
There is no optical instrument so well known or so highly held in popular estimation as the Magic Lantern. It is somewhat unfortunate that its old appellation, given to it when it was nothing more than a mere toy, should have stuck to it so long. And more than one attempt has been made by those conversant with its capabilities as a scientific instrument, and as an important aid to education, to give it a name more consistent with its real value. The late Mr. Dalmeyer was, I believe, the first to re-christen it the ‘Optical Lantern;’ and there is evidence that others are adopting the term, and that in time the old name will sink into oblivion.
With regard to the early history of this[Pg 2] deservedly favourite contrivance, but little is known. Its invention has been ascribed to Friar Bacon, but the evidence on this point is of the most legendary character. It seems, however, certain that the first to give an intelligent description of it was Kircher—a Jesuit who lived two and a half centuries ago, and who published a work entitled ‘Ars Magna Lucis et Umbræ,’ or ‘The Great Art of Light and Shadow.’ The body of the lantern, as described by Kircher, consisted of a room several feet across, furnished with an opening in which a lens was placed. The source of light was an oil-lamp, and the pictures for exhibition were of the roughest kind. Indeed, we may presume that the effects produced fell far short of those attained by the cheapest toy lantern of our schoolboy days. Even if we search the columns of an Encyclopædia or any similar book of reference of forty years ago, we shall not find any great improvement on the description afforded by Kircher. The magic lantern will there be found described as ‘an optical toy, by which glass pictures executed with coloured varnishes can be thrown upon a wall or screen.’
But from this time a gradual improvement began. First, the old oil-lamp was replaced by the argand burner; then came gas; finally[Pg 3] the brilliant lime-light—and some time in the near future, perhaps, will come electricity. The improved means of obtaining light have naturally led to larger pictures being thrown on the screen; for the size of such pictures is governed only by the amount of light available. Thus, supposing we own a modern lantern constructed with one of the improved three or four-wick lamps, and that it will give us a good picture of about six feet diameter, by using the same lantern, and without any change whatever in its optical arrangements, save fitting it with a lime-light jet, the disc can be increased to fifteen feet diameter. A picture of the same size could be produced with the original lamp, provided that the operator retired to the necessary distance from the screen, but the light would be so attenuated that the picture would be but a ghost of what it ought to be. It will therefore be understood that the enlarged image formed by the lantern lens can be made to fall at any point in front of that lens, and may be of any size; but to render it practically available its size, and therefore its distance from the lens, must be regulated by the amount of light at disposal.
During the past few years two circumstances have combined to render the optical lantern[Pg 4] more popular than ever: one being the introduction of photographic transparencies representing scenes from the remotest parts of the earth, and the other the construction of metal-bodied lanterns of improved character, and burning mineral oil. As a good paraffine lamp is compared with a farthing rushlight, so is one of these lanterns to the toy of our boyhood. The light given, although it falls far short of the brilliance of the lime-light, is much more intense than could have been hoped for some years ago from oil. But its brilliance is not all due to the paraffine, but quite as much to the careful ventilation and general construction of the flame-chamber. There is, too, no danger in the use of this form of lantern, for the reservoir containing the paraffine is far below the combustion-chamber, and therefore it cannot become unduly heated.
The lenses, too, in this new form of lantern, although placed in the same position as those in the old-fashioned magic lantern, are of a very different stamp. And this leads me to a brief consideration of the optical system comprised in these instruments.
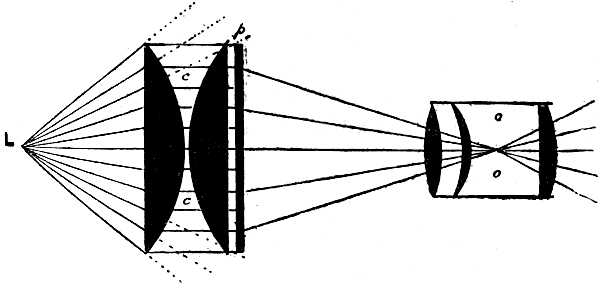
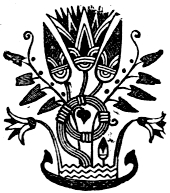
Fig. 1.
L, Light; c, c, Condensing lenses; o, o, Objective lenses.
There are two sets of lenses: one being known as the condenser, and the other as the objective. The condenser is made up of two or more glasses, the usual form consisting of [Pg 5]two plano-convex lenses placed face to face. The duty of this condenser is to take up as much as possible of the light afforded by the lamp, and to change the direction of the rays so that they are cast through the picture or slide placed in front of it. A glance at Fig. 1. will show how this is accomplished, and how the rays indicated by the dotted lines would be lost if not turned to account by the condenser. The use of the objective, on the other hand, is to magnify the image of the picture, and to present it in as perfect a form as possible on the screen placed for its reception. Its distance from the picture is governed by the distance of the lantern from the screen, and[Pg 6] can be regulated to a nicety by the focusing screw attached to it. It is generally acknowledged by all acquainted with the requirements of the lantern that the photographic camera lens (known as the quarter-plate portrait lens) fulfils admirably this duty; and this particular form of lens, which is by no means expensive, is generally fitted to modern lanterns of the mineral-oil type. The condensers vary from four to three inches in diameter; perhaps the best size is three and a half inches. The relative positions of condenser, light, slide, and objective are indicated in the diagram to which attention has just been called, Fig. 1.
The optical lantern always inverts the image of any picture projected by it, an inconvenience readily obviated by placing the slide on the stage upside down. At the same time the picture must have its front turned towards the condenser, not away from it, otherwise every part of the slide suffers reversal on the screen. In some cases this does not matter, but when any wording, such as that on a signboard, for instance, is contained in the picture, it reads backwards. Such accidents can be prevented by a white label, easily seen in semi-darkness, placed in a certain position on the picture. If such a precaution had been observed at a certain[Pg 7] exhibition at which I was present, General Garfield would not have been shown standing on his head—not a dignified position for the President of the American Republic.
The first lanterns, constructed to burn mineral oils, were very different to those of modern make, and took their pattern from the cumbrous instruments which before them were provided with colza-oil lamps. The reservoir for the oil was carefully kept in a cistern at the back of the lantern, and bubbled through a pipe to the lamp on the same principle that water is supplied to an earthenware poultry fountain. It was doubtless thought necessary in those days to maintain the paraffine in the cistern at a height equal to or above the wick, as in the case of colza and other heavy oils. But paraffine is more of the nature of a spirit—for it volatilizes very readily—and in modern lamps for lanterns the reservoir is kept some inches below the point of combustion. By the time that the liquid reaches this point, it has become so heated in the course of its passage along the metal wick-holders that it issues as a gas. This can be readily proved by turning down the wicks after the lantern has been burning some time, when the flames will remain above the wick-holders, although the[Pg 8] wicks themselves have been turned down quite out of reach. In the older lanterns, too, the glass chimney was thought to be indispensable, but now this has been done away with, and with it the cylindrical wick has also gone. The modern combustion-chamber is made of charcoal iron, and is closed at one end with a thin pane of glass, just outside which the condensing lenses are placed, and at the other end by a silver-plated reflector. The necessary air to promote combustion is admitted by suitable orifices below, and a draught is established by a long iron chimney above.
There is no great difficulty in managing one of these lanterns. The loosely plaited cotton wicks should in the first instance be carefully cut parallel with the wick-holders. After this they do not require much attention. It is a far better plan to remove the charred end of the wicks by scraping them along with the back of a knife, than to be always cutting them afresh. However, any loose strands that may project from the cotton should be certainly snipped off with scissors.
After lighting the lantern—which is best done with a long wax taper—each wick should be turned down quite low, and the combustion-chamber closed. In about two minutes, by[Pg 9] which time the front glass and the lantern generally will have become warmed, the wicks should be turned up to their highest; that is to say, to a pitch just short of smoking-point. If the wicks are turned low for any length of time the lamp will be sure to smell. It will also smell if, in the process of charging with oil, some of the liquid has been smeared against any part of the lantern which may afterwards become heated. The best oil only should be used.
I have already hinted at the educational value of the optical lantern, but those who have not experimented with it have but a faint idea of its capabilities in this respect. I am of the opinion that every school and college should possess one, and that both pupils and teachers would soon discover its many advantages. Now that it is manufactured in such a portable and efficient form, and can be so easily managed, there is no possible hindrance to its adoption, unless it be its old name of ‘magic lantern,’ which is associated with things too childish for consideration. But this objection cannot hold good when it is pointed out how many different branches of knowledge can be illustrated by its use.
The schoolmaster of a London Board School once told me of some of his difficulties[Pg 10] in teaching such a subject as geography. Most of the children had never seen the sea, and many of them had never even travelled so far as the Thames. What notion could such waifs have of a mountain, a valley, a cliff, or even of a rock? The value of the optical lantern at once becomes apparent here. But better informed children in high-class schools, although they see many places beyond the London streets, can yet reap much advantage from the mode of instruction which I am advocating; and as the range of knowledge increases, so will some such means of illustration be forced upon teachers. The labour and expense of tracing a dozen diagrams on glass, in the way hereafter explained, is considerably less than that involved in drawing a single large diagram for the schoolroom wall. By this easy method the illustrations in any book can be roughly copied and rendered available for an entire class.
In the higher branches of knowledge the lantern can also give its help. Botany, zoology, and natural history generally can be illustrated by diagrams, photographs, and in many cases by natural preparations. The revelations of the microscope can be transferred to the lantern, and the most complex organisms can be seen clearly defined and[Pg 11] magnified many hundred times their natural size. It is possible, too, to show by the lantern many interesting experiments in chemistry and electricity which cannot be shown to a large number of persons in any other way. Let me cite for instance the formation of crystals, which can actually be watched in progress, highly magnified, by the simple expedient of smearing a piece of glass with a solution of sal ammoniac and placing it in the lantern. There are several adjuncts which may be fitted to a first-class lantern which I have not space to notice in detail. With the lantern-microscope ordinary microscopic slides can be utilized, and tanks for containing the living denizens of our ponds and ditches may be employed. The marvels of polarised light may be demonstrated with the lantern-polariscope. By another special device called the ‘aphengescope’ and which is made to fit on the lantern, opaque objects can be thrown on the screen. It is possible, for instance, to utilize ordinary photographs or diagrams on card, to show the moving works of a watch, sections of fruit, and many other objects as explained in a subsequent chapter.
The lantern, at the time of exhibition, should stand firmly. It can, if it be a small one burning oil, be placed on a box standing[Pg 12] upon a table. I myself prefer to place it on a photographic tripod-stand, and this I effect by screwing on to the top of the stand a base-board upon which the lantern firmly fits. For large lanterns, such as the lime-light biunial, a far more solid arrangement is requisite. My own method is this. The lantern screws on to the top of its travelling-box, at the lower corners of which are sockets to admit four wrought-iron legs. These legs are bent outwards, and what I may call their toes are turned out, and have a hole into which a screw may be inserted and driven into the floor. The lantern is fastened to the box by two hinged pieces at the back, so that the nozzles can be raised to any extent desired.
The lime-light consists of a jet of mixed hydrogen and oxygen gases under pressure, ignited, and forced upon a cylinder of lime, which it renders white-hot. The heat given by these gases is second only to the heat of the electric arc, and will melt that most refractory of metals, platinum. Even the lime block cannot withstand the great heat to[Pg 13] which it is exposed, but is quickly pitted under the action of the flame. Hence lime-light jets are furnished with an arrangement by which the lime cylinder can be turned at frequent intervals, so as to offer a fresh surface for the gases to play upon.
There are three kinds of jet used for the lantern. Firstly, a jet in which a stream of oxygen is forced through the flame of a spirit-lamp on to a cylinder of lime. This form is perfectly safe, and although it presents an immense improvement upon any form of oil arrangement, does not afford sufficient light to illuminate a screen more than about nine feet in diameter. Secondly, there is what is known as the blow-through jet. In this case the jet is connected with the house gas, and the oxygen meets it at the point of ignition, and is blown through it on to the lime. This form of jet is also safe; indeed, it is often called ‘the safety jet,’ and affords plenty of light even for professional use. It is the one that I recommend the amateur to work with. Thirdly, there is the mixed jet, in which the two gases in separate bags are both under pressure, and mix together before reaching the external orifice. This form of lime-light gives the most light of any; but such care is requisite in dealing with it, that I[Pg 14] shall say no more about it, considering it unfit for casual acquaintance.
A beginner might fancy that it would be a simple thing to mix the two gases in one bag, put it under pressure, and use them thus. So it would, and a beautiful light would be the result. Probably a beautiful explosion would be another result, for the two gases mixed form a most terrible compound, and a bag so charged would be almost equal in danger to a live shell.
With the spirit jet, or the ‘blow-through,’ the operator need have no fear of danger. Oxygen is not an explosive, and, although the best supporter of combustion, is not itself capable of being ignited. The spirit jet I should not recommend, except in situations where coal gas is not obtainable, so in my directions for using the lime-light, let it be understood that I am considering the employment of the blow-through, or safety jet.
Let us suppose, then, that we are preparing for an exhibition. The gas is made, and is at hand in the gas-bag; our lantern—and I will, for simplicity’s sake, consider it a single lantern only—is raised on its stand-table, or other support, at a convenient height from the ground, and we wish to have a private rehearsal in order to see that all is right.[Pg 15] The first thing is to attach the hydrogen terminal of the jet, marked H, by flexible tubing to the nearest gas-bracket. Now take a cylinder of lime from its box, clear out the hole in the centre with a bit of wire, or a match, and place it on the pin provided for it above the jet. See that it turns freely, and so adjust the pin that the lime is distant from the jet nozzle about the sixteenth of an inch. Light the gas, and turn it down so that the flame is about an inch high. This can be done with advantage an hour or more before the lantern is really required, for the lenses and body of the lantern will by this means get thoroughly warmed, and any moisture upon the glasses, which would show as a blemish on the sheet, will be removed.
In all cases the hydrogen should be lighted first, if only to thoroughly warm the lime. Now the oxygen-bag can be put between the pressure-boards, and connected by another tube to the tap marked O. A half-hundred-weight having been put on the boards, the gas-bag tap may be turned on to the full. We may now attend to the jet. Turn on the hydrogen so that it flames up some inches over the lime, then gradually turn on the oxygen. At first it is air only that comes away, but presently with a characteristic little[Pg 16] snap the two gases come together, and the brilliant lime-light is produced. A little care in adjustment of each tap alternately will soon show us the amount of gas from each which will give the best result.
It will soon be apparent to the operator that the spot of light on the lime must be exactly in the axis of the system of lenses, or the effect upon the sheet will be spoiled. The vertical movement of the jet is governed by a little screw, which holds it to the post on which it is fixed, which post stands upon an iron tray gliding between grooves. We must raise or lower the jet until the right place is found, when the screw can be brought home, and the jet is fixed. Even now, most probably, we shall find that the outer margin of the disc is ill-defined. This shows that the light is either too near or too far from the condenser. By moving the jet on its tray bodily backwards and forwards, we shall soon be able to find its correct position, and when found, that position will hold good to the end of the exhibition. We can now put a picture on the slide-stage, and focus it by means of the screw on the front lens. If the lime is properly adjusted and centred, our picture will be illuminated equally well in every part.
[Pg 17]
So far, we have considered the production of a brilliantly illuminated picture with a single lantern. For many years after the lime-light came into use, this was all that was required of it. But suddenly the beautiful effect known as dissolving views was contrived—an effect which, at the time of its introduction, made a wonderful sensation—and the method of producing which was for a long time kept secret. The old way of dissolving one picture into another, and the way which must still be adopted if oil-lanterns are in question, was to use two lanterns, side by side, and by a kind of see-saw arrangement in front of the lenses, to gradually uncover one nozzle whilst the other was being closed. This was easily done by furnishing each end of the see-saw with a screen of tin, the edge of each being cut into teeth like a comb. The one picture was thus caused to mingle with the other until the first lantern was quite closed, when the new design became perfectly disclosed. It soon became evident that the same effect could be produced more simply and economically with the lime-light lanterns, by contriving a special form of gas-tap[Pg 18] which would slowly turn off the gases supplied to one lantern, while it as slowly admitted the gases to the other. By this arrangement nearly half the gas supply is saved, and therefore very little more is wanted for a dissolving-view apparatus than for a single lantern.
Dissolving view, or biunial lanterns, as they are generally termed, are now made in very compact form. The two systems of lenses, one above the other—not side by side as of old—are fitted into one mahogany case, lined with tin, and furnished with doors, so that the lights can be tended when necessary. At the back of the arrangement is placed the dissolving-tap, which is connected by indiarubber tubing with the lime-jets, and has two nozzles by which the hydrogen and oxygen respectively can be supplied to it. The dissolver is also furnished with by-passes, so that when the gases are turned from one lantern, just sufficient remains to keep the jet turned down ‘to the blue.’
The management of a pair of lanterns like this is, of course, much more onerous than that of a single lantern; but when once understood presents no difficulty. Before lighting up, be quite sure that all connections—and there are many—are quite secure, and[Pg 19] that each place where indiarubber tubing fits on to metal is secured with twine. Now light the hydrogen in both lanterns, which you can do by placing the dissolving-tap in an upright position. Move the dissolver until the upper jet seems on the point of going out; but prevent it doing so by opening the hydrogen by-pass, and adjust this little tap so that the flame remains about one inch high when the other lantern is being used. Move the dissolver backwards and forwards a few times, so as to see that it works well, and that the hydrogen flares up in each lantern alternately.
We can now pay attention to the oxygen supply. First see that the bag is properly adjusted between the pressure-boards, and that the weight—one 56 lb. weight is sufficient to begin with—is in its place, above the upper board. Attending to the lower lantern first, turn up the hydrogen, and very gently admit the oxygen by turning the tap attached to the jet. When the light has been satisfactorily established, the oxygen by-pass must be turned in the same way that the other by-pass was just now treated, so as to admit a small amount of gas passing to the lantern not in use. If this be not done, the sudden inrush of the oxygen is sure to cause[Pg 20] a small explosion, which will blow the light out. This does not indicate any danger whatever, but is inconvenient and undesirable during an exhibition. The upper lantern may now be attended to with the same precautions; and if all has been done well, the light will move from jet to jet alternately, as the dissolver is worked.
In using a double lantern, it is necessary to make both pictures coincident on the sheet. If one picture overlaps the other at every change, it has a most slovenly appearance. Such an error can be avoided by manipulating certain screws fitted to the metal front of the lantern, by which the two discs thrown upon the sheet can be adjusted until they quite coincide. These screws allow the lower nozzle to be pointed slightly upwards, and the upper one to point downwards, so that the images cast by each may be made to meet at the screen.
The double lantern is mainly employed for dissolving views; but its use does not stop here. A great many beautiful “effects” can be compassed by its means, a few of which I may here describe. Statuary slides form very beautiful pictures if photographed direct from the marble; but their effect is much enhanced if, by means of the auxiliary lantern, a glow[Pg 21] of colour is thrown upon the screen at the same time. A few squares of differently tinted glasses, each mounted like an ordinary slide, with a mask of oval or round shape, are all that is needed. Again, a wintry scene in one lantern may be much improved by the effect of falling snow, produced by working a special form of slide in the other lantern. This slide consists merely of a frame containing a roller at the top with the handle projecting outside. As the handle is rotated, a long ribbon of black paper pierced with needle-pricks is rolled up upon it, and each prick makes a descending spot of light upon the screen, which together look exactly like falling snow. Sunset and moonlight effects, windows lighted up in night-scenes, ripples upon water, can all be managed by specially-devised ‘effect’ slides in the second lantern. These effects can be much extended when a triple lantern is employed; but as this instrument is not often found—out of the hands of professional operators—we need not further allude to it.
But the double lantern can be used with great advantage from an educational point of view, in a manner that was first suggested by the present writer. I mean in the demonstration of the main features of Spectrum[Pg 22] Analysis. Let me cite one example. A slide prepared and coloured so as to represent the continuous solar spectrum, marked with the principal Frauenhofer lines, is placed, say, in the lower lantern. We now wish to show the bright lines given by an incandescent metal, say sodium. A slide, all blackened out but the double D line due to sodium, and so placed on the glass that it will exactly register with the D line in the coloured spectrum slide, is placed in the upper lantern. The dissolver is now brought into play, and can be so adjusted that while the continuous spectrum has all but faded away, the two brilliant sodium lines stand out boldly in their proper place. The spectra of all the other metals can be treated in exactly the same manner, keeping the continuous spectrum in the lower lantern for constant comparison and reference.
There is very little danger incurred in the use of the lime-light if only the operator be intelligent in its employment. But there are certain dangers connected with the preliminary making of the oxygen gas, so that that part of[Pg 23] the work should only be entrusted to a careful worker, and one who, knowing where the greatest care is required, will take every precaution against disaster. I have myself made several thousand feet of oxygen on different occasions, and have never yet met with any mishap; but as I know of cases where serious accidents have occurred, I have endeavoured to find out why they have happened, and I now consider myself forewarned, and therefore forearmed, against their repetition. The articles required for making the gas comprise a retort in which to generate it, a gas-stove to furnish the necessary heat, a wash-bottle or purifier, an indiarubber gas-bag, and several feet of tubing. Beyond these is wanted the mixture of chlorate of potash and peroxide of manganese in powder, which forms the charge of the retort, from which the gas is generated on the application of heat.
I have found that the best proportions of chemicals to use are four parts (by weight) of chlorate to one of manganese. Before being mixed together, both should be most carefully picked over, and most probably both will yield a small crop of bits of straw and wood-chips, which are not only injurious, but would in sufficient quantity prove actually dangerous if permitted to remain. The larger crystals of[Pg 24] the chlorate, and any lumps which may be found in the manganese, should be rubbed down to powder by gentle pressure with the wooden spoon used for mixing the compound, about two pounds of which will yield sufficient gas for an evening’s show. The mixture can now be funnelled into the retort, the nozzle of which, after being blown through to see that the passage is clear, can be screwed into its place.
The purifier, or wash-bottle, is made of tin, or may consist of a wide-mouthed bottle with an indiarubber cap, fitted with inlet and outlet tubes of metal or glass. In either case the vessel is three-parts filled with water, the inlet tube dipping some inches below the surface. This tube is subsequently connected by three or four feet of indiarubber tubing with the retort. As the gas is given off, it bubbles through this water, which not only cools it, but catches the particles of solid matter which are sure to be blown from the retort. The outlet tube is connected with the gas-bag. In the annexed illustration the relative positions of the retort, purifier, and gas-bag are shown, but in practice certain modifications are desirable. It is as well, for instance, to stand a chair between the retort and purifier, upon which the connecting rubber tube may rest, otherwise the water evolved from the crystals[Pg 25] of potash will condense in the tube and obstruct the passage of the gas. Again, the gas-bag, instead of being on the same level, should be laid on a table, so that any water accidentally driven from the purifier may not be forced into it. The rubber tubes should have an orifice of nearly half an inch, and should on no account contain an inside coil of wire. Previous to making gas the bag should be warmed for an hour or so in front of a fire, so as to make it soft and pliable. The cock should then be opened, and the bag rolled tightly up so as to expel any air. The tap should then be closed.
Fig. 2.
Diagram showing relative positions of g b, Gas-bag; w b,
Wash-bottle; and r, Retort.
When all is ready, and every junction made except that between the bag and the pipe leading from the purifier, the gas-stove may be kindled, but turned down almost to its lowest[Pg 26] point. If this precaution be not observed, the oxygen will come off with such rapidity as to be quite out of control, and will probably blow the connections away. In two or three minutes the gas will commence to bubble through the purifier, at first intermittently, but the bubbling will gradually become more regular, until it is evident that oxygen is coming over in earnest. The brightening of a spark at the end of a blown-out match, held to the end of the purifier-tube, will announce the fact that all the air has been driven out of the pipes, and that gas has taken its place. Now is the time to connect the gas-bag with the purifier. With a quick movement the indiarubber tube should be slipped over the nozzle of the bag with one hand, while the tap is turned on with the other. The gas should now come over regularly until the bag is nearly half full, and this will occupy about fifteen minutes. The action will then probably flag a little, when the flame feeding the stove may be increased. When the bag is nearly full the flame can be raised, if occasion should require, to its utmost.
Some care is requisite in finishing the operation. When the bag is quite full and as tight as a drum, it should be disconnected before anything else is done. Of course at the moment[Pg 27] of taking the tube from it, the tap must be turned. The next thing is to detach the retort from the purifier before the gas is extinguished in the stove. This is a most important point, for if the retort were cooled by putting out the gas first, the water might be sucked into the retort from the purifier, and a small steam-boiler explosion would be the result. In an hour or so the retort will be cool enough to handle, when the nozzle can be unscrewed and the vessel washed out with several changes of hot water. It can then be dried and put away for the next occasion. The retort-nozzle and its indiarubber tube should also be washed out, or it may get clogged.
Particular care must be taken to purchase the chlorate and manganese of some reliable dealer. Accidents have been reported owing to lamp-black, bone-black, etc., having been supplied in error for the manganese, which is a black powder much resembling them. I find that the best plan is to buy several pounds of each at a time, and to test a small quantity of the mixed ingredients in a test-tube over a spirit-flame. If the gas comes off with a slight sparkling of the ingredients all is right; but if there is anything approaching to an explosion, the manganese is at fault. One accident which I heard of was due to connecting the retort to[Pg 28] the wrong side of the purifier; the gas had no outlet, and the retort exploded, breaking all the windows of the room in which it was.
Retorts are made either of copper or iron. I have tried both, and much prefer the latter, which have also the advantage of being cheaper than the copper ones. A good retort should serve for at least fifty charges, and even then a new bottom can be put into it, and it will do duty for another fifty. But no retort will last long unless properly treated. I am quite satisfied that the spent charge if allowed to remain has the effect of eating into the metal; it should, therefore, be washed out soon after use. The thickness of a retort after much use can be gauged by tapping it with the back of a knife when empty.
The oxygen gas is most usually stored in an indiarubber bag. These vary very much in quality, and the cheapest kinds are to be avoided. The rubber should be soft and pliant, and should be covered outside with stout twill. A good bag will almost last a lifetime if it be only used occasionally. I have had one for many years, which looks shabby enough with constant use, but seems to be as gas-tight and as efficient generally as the first day I had it. Even then it had been in use for some months by a friend.
[Pg 29]

Fig. 3.
Iron bottle for compressed oxygen gas.
A bag full of gas is not the most portable thing that could be named, and various attempts have been made to replace it by some contrivance of a more convenient character. There is, too, the danger of accidental injury, which can readily occur if the bag is carelessly handled. In very cold weather, for example, some bags get quite stiff and hard, and have to be almost thawed before they can be used. Neglect of this precaution will lead to cracks, which will eventually turn into holes. Metal gas-holders—miniature copies of the big reservoirs seen at gas-works—which serve as travelling-boxes for the rest of the apparatus—are recommended by some, but are seldom used. Perhaps the most convenient arrangement—which, however, is only suitable for a single lantern—is to employ an iron bottle in which the oxygen is greatly compressed. Such a bottle charged with gas can be obtained from several dealers, and I have had some little experience of their use. A bottle measuring three feet in length, and about[Pg 30] seven inches in diameter, will hold about eight feet of compressed gas—sufficient for an ordinary evening’s work. At the end of the bottle is an opening closed with a tap which can only be opened by a special form of key. Into this orifice is screwed a nozzle, upon which an indiarubber tube can be readily fitted. When a bottle of this kind is used, the amount of oxygen which reaches the lime must be directly controlled by this tap, and not by the tap attached to the jet, which must remain fully opened. The reason of this is that the gas issues with such force, that, unless controlled in the way I have stated, it will blow off the tubing by its pressure. I found it so difficult to regulate the supply, that I had an independent screw-tap made to fit on to the bottle. This screw-tap is of the same pattern as those used on steam engines to control the supply of steam to the cylinder, and with it I can adjust the oxygen supply with the greatest nicety. My chief objections to the bottle system—which presents many advantages in the matter of portability—are, firstly, that you cannot charge the bottle yourself—it must always go back to the dealer for that purpose—and you are therefore dependent for one of your first requisites upon others; and secondly, you do not know how much[Pg 31] gas you are using, for you cannot see it diminish as you can when you employ a bag. For these and other reasons I still prefer bags to store my gas, and shall continue to do so until some improvement comes about.
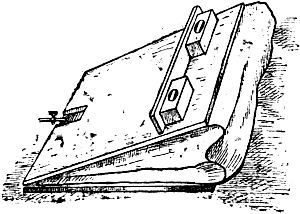
Fig. 4.
Gas-bag and pressure-boards.
The gas-bag is wedge-shaped, and the thin edge of the wedge has in its centre a gas-cock for the entrance and exit of the gas. The object of the bag being in this form is, that it can conveniently be placed between the pressure-boards. These, in their simplest form, consist of two boards strongly put together—the size of the bag which is used—which are hinged together at one end. At the centre of this end, and between the hinges, is cut an oval opening through which the gas-cock is thrust. A shelf on the upper board serves as a support for the weights. At least two weights are required—one being sufficient at[Pg 32] first, when the bag is full; the other being added later on when the pressure becomes reduced. The weighted gas-bag should always be placed as near the lantern as circumstances will allow—in order that it may be under the eye of the operator—and the tube from it which supplies the lantern should be guarded, so that it is not accidentally stepped upon.
The lime-cylinders are sold in air-tight tin canisters holding one dozen each. They are of two qualities—hard and soft. For work where large pictures are required—necessitating the use of the mixed jet with both gases under heavy pressure—the hard limes must invariably be used. But where only a small sheet has to be covered, and one gas only is subjected to the unusual pressure, the soft limes will afford perhaps a better light than the harder ones. Occasionally the lime, be it hard or soft, will split. In such a case it ought to be immediately replaced by a fresh one, otherwise the flame may possibly be diverted towards the condensing lenses, and will fracture that nearest to the light. It is advisable always to keep a spare lime within the lantern, lying on the tray to which the jet is attached. By this means it gets warmed, and ready for use if required. Lime is most absorbent of moisture, and will, if kept where air[Pg 33] can get to it, swell to double its former size, and finally crumble to powder. For this reason the tin canister containing the cylinders should have stretched over it, when once opened, a broad indiarubber band which will cover the junction between lid and box. If this precaution be neglected, the limes will swell with a force sufficient to break the tin-containing vessel asunder. A compressed lime cartridge, to which water is applied by artificial means, has lately been successfully introduced to supersede explosives hitherto used for mining purposes. This will show the immense power of expansion of which the substance is capable.
And now a word about the best form of screen or sheet for showing lantern pictures upon. The best possible form of surface is a smooth whitewashed wall; but as this is not commonly found among the appointments of a sitting-room, where the lantern will be wanted, we must find some substitute which will most nearly resemble it. A sheet of cartoon paper, which can be bought of any length, and measuring more than four feet across, will do well if only a small disc is[Pg 34] desired. The paper can be rolled up out of the way at a minute’s notice. If a larger screen is wanted, it can be made of stout calico, faced with white paper, and can be made to roll up and down like a school map of large dimensions. A map-mounter, or even an upholsterer, would soon rig up such an arrangement.
There is a very effective way of showing small pictures and diagrams with an oil-lantern, which I have more than once adopted, where a room has been long in proportion to its breadth. This is to make a wooden frame just large enough to take the full width of a sheet of tracing-paper, and to put this screen between the lantern and the spectators. Tracing-cloth should be avoided, as it is so transparent that the light streaming from the lens makes a blotch in each picture when seen through it.
If the lantern is brought into regular use—in a schoolroom, for instance—it might be thought worth while to have a canvas sheet whitewashed, and hung in the same manner that a stage drop-scene is fixed. In making such a screen, the canvas should be tacked on a frame, and should have a coating of thin glue, which should be allowed to dry before two or more coats of whitewash are applied.[Pg 35] It will be understood that a really opaque screen, such as this represents, is the more effective, because the light, instead of being partly lost—as it must be in penetrating an ordinary calico sheet—is reflected and utilized.
But for public exhibitions on a large scale, the calico sheet is the screen commonly in vogue, for it is conveniently put up and taken down, and can be rolled into a bundle for easy transport. A sheet properly hung should be as flat as a board and perfectly free from wrinkles of any kind, and this can be accomplished without much difficulty by adopting the following method, which is applicable to screens from twelve feet square upwards.
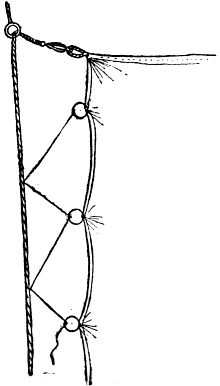
Fig. 5.
Showing method of hanging a sheet.
The sheet should have at its top edge a strong cord sewn into its hem, which cord should terminate at each side with a loop. On its sides and bottom edges, the sheet should have brass curtain rings sewn on to it at intervals of two feet. Having chosen the position of the screen, a couple of screw-eyes are screwed into the roof, or cornice near the top of the hall, at such a distance apart that the sheet can easily go between them. Through each of these screw-eyes is passed a thin, strong line, having at its end a clip like that commonly attached to a dog’s chain. This clip is to clutch the loop of rope on each[Pg 36] side of the sheet. The sheet can now be pulled up into position: the free ends of the cord being fastened to screw-eyes in the floor. It now merely remains to lace with string the curtain rings on the side of the sheet to the adjacent cord, and the arrangement is complete. The annexed diagram shows the upper corner of such a sheet, with its attachments, as just explained. Where the hall is of such a height that this plan is not available, or where the stern custodians faint with horror at the thought of their walls or ceilings being pierced with a screw-hole, the same method[Pg 37] can be carried out by fastening the screw-eye to a timber upright on each side, supported by light struts.
Some persons prefer a sheet stretched on a frame, and such a frame of a very portable character can be easily devised. The frame itself is best made of lengths of pine, about the size of broom-handles. These can be joined together so as to make a frame of any reasonable dimensions, by six-inch lengths of brass tubing. The same tubing, mitred into L-pieces, will serve for the four corners. The sheet is furnished with tapes to secure it to the frame, and the woodwork is kept in an upright position by strong cords fastened by screw-eyes to the floor. The appearance of such a screen is much enhanced if the plain woodwork be hidden by a little drapery in the shape of narrow curtains at each side, and festoons of the same material above.
Before the advent of the art of photography, pictures or slides for the lantern were traced on glass and painted by hand; and this art was carried to very great perfection. But no handiwork can equal the productions of the[Pg 38] photographic camera; so that when it was found possible to produce transparent positives on glass, that could be magnified on the sheet to any extent without deterioration, the occupation of the artist on glass was almost gone. Photographs are now almost exclusively used, and form, when properly executed, the finest pictures for lantern use. The manner of their production is fully described in my little book ‘How to Photograph;’ but as there may be many would-be lanternists who do not care to dabble in photography, I will here give a few plain directions by which lantern slides can be extemporised.
The standard size for lantern pictures is 3¼ × 3¼ inches. The glass chosen should be as thin as possible, and quite free from scratches, bubbles, or flaws of any kind whatever. Remember that a piece of the finest hair which may well be overlooked upon the slide itself, will appear on the screen as a huge snake. In like manner a tiny bubble in the glass is magnified into a blemish the size of a soup-plate. Glass presents a very difficult surface to draw or paint upon, particularly if water-colours are employed, but by coating it with a transparent medium in the first instance the difficulty is much reduced. A film of plain collodion will, when dry, give a surface that[Pg 39] can be easily sketched upon with a fine pen and Indian ink. The sketch so made can afterwards be filled in with water-colour, tempered with prepared ox-gall, and taking care that the colours used are those which are naturally transparent. Prussian blue, indigo, lake, the madders, gamboge, burnt and raw Sienna, Vandyke brown, are all transparent pigments, and will answer every purpose. Mixed with one another in the manner detailed in any manual of water-colour painting, greens, purples, and all secondary and tertiary tints are readily obtainable.
Another method, and an easier one, for producing lantern slides was introduced some years ago by the Rev. W. H. Dallinger; and although the author of the method intended it for drawings of microscopic subjects only, and with that idea brought it before the notice of the Royal Microscopical Society, it will be readily seen that it is adapted to all manner of lantern pictures. This method is best described in its inventor’s own words: ‘On finely ground glass drawing with a black-lead pencil is as easy as drawing upon cardboard. I get squares of glass to suit the size of my lantern carefully ground on one side like the focusing-glass of a camera.’ The author goes on to describe how, by sketching upon[Pg 40] the finely ground surface with a well-pointed hard pencil—HH or HHH—and shading with a softer one, such as HB, capital effects can be obtained. ‘If it be necessary to put in colour it may be done, cleanly and carefully over the shading; thus one layer of colour suffices. Now, of course, although we have a perfect drawing of the object, with all the detail accurately given, it is not a transparency. But we can easily make it one. Thin some good pale Canada balsam with benzine to about the consistency of cream, and simply float it over the ground surface of your glass; pour off until the drop comes very sluggishly. Then reverse the glass so that the corner from which the balsam was flowing off be placed upwards. Let the return flow reach about the middle; then reverse it again, and move it in several directions to get the balsam level. This may be done with a very little practice, so that the surface shall be undistinguishable from glass. We have now a perfect transparency. All that is required is twenty-four hours for hardening (keeping the glass level), and then another square of glass fastened on to it by strips of paper at the edges, with small pieces of card at the corners to prevent contact, and it makes an admirable lantern transparency.’
[Pg 41]
A hint about giving a fine grain to glass will not be out of place. Upon a perfectly flat and firm table lay a piece of glass say six and a half inches square, for this size can afterwards be cut across into four lantern pictures. A sheet of wet blotting-paper under the glass will keep it steady. Now pour upon its surface a mixture of flour-emery and water. Place another piece of glass above, and work it round with a circular motion, constantly spooning up the mud formed by the emery and water, and which oozes out between the glasses, and replacing it between them. In a short time both glasses will be beautifully ground on the surfaces which have been rubbed together. A moment’s consideration will show that the ground effect is produced by the surface being broken up into innumerable tiny pits, each one of which scatters the light. By Mr. Dallinger’s method of filling up these pits with a glassy medium like Canada balsam, the glass is once more presented with a flat surface, and therefore becomes once more transparent.
By whatever means the picture is produced the operator should have a glass transparent easel to work upon placed at an angle of forty-five degrees, with a sheet of paper underneath it to throw the light up through the glass he[Pg 42] is drawing upon. A good easel can be made of a small frame—that belonging to a twopenny slate will do—attached to a base-board, and supported on each side by struts. A ledge of wood screwed across the frame makes a convenient support for the picture. The annexed cut will sufficiently explain the arrangements described.
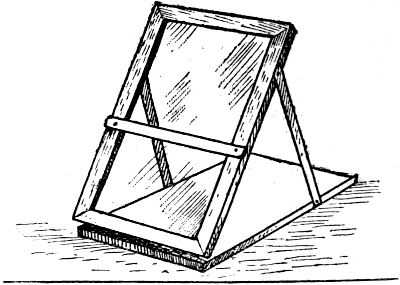
Fig. 6.
Glass easel.
And now a word or two about mounting the picture. As Mr. Dallinger points out, a cover-glass should be provided, but it should be prevented from actually touching the painted surface. This is best brought about by using the masks cut out of black paper, and sold for the purpose. A mask is inserted between the glasses, after which the whole is fastened[Pg 43] together by pasting a slip of paper round the edges of the double glass, and turning it over on either side. Gum arabic with twenty-five per cent. loaf-sugar added, is a good medium by which to attach paper to glass.
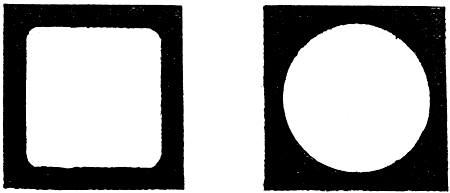
Fig. 7.
Masks for lantern slides.
There are many amateur photographers nowadays who can produce fair transparencies for the lantern, but at the same time there are many possessors of a lantern who know nothing about the ‘black art.’ Luckily for these, first-class pictures can be bought cheaply, their average price ranging from eighteenpence to two shillings each. Any optician’s catalogue[Pg 44] will show what an immense variety of subjects there is to chose from; not only can we obtain landscapes of nearly every part of the world, but we can purchase figure studies, copies of various pictures from books, maps, diagrams of scientific matters—micro-photographs and statuary. These slides if coloured are double the price of plain ones, and if very well coloured their price is quadrupled.
It would therefore be serviceable to many if they could learn how to colour such pictures for their own use, and I give simple directions how this can be accomplished. At the same time it is only fair to state that the work is really difficult, and anyone to attain even slight proficiency in slide-painting must devote a great deal of time and patience to the subject.
The photographic slide as sold consists of two glasses, one of which bears the photograph. This is separated from the cover-glass by a paper mask, the whole being bound round by a fillet of gummed paper. After carefully cutting round this fillet the two glasses may be separated, and the one bearing the picture is placed, varnished side upwards, upon the glass easel, ready for colouring. Some colourists speak in favour of water-colours for glass-painting, others prefer oil-colours, while some,[Pg 45] I understand, employ both on the same picture. I have tried each system, and most certainly recommend oil-colours as being both easier to work with, and doing more satisfactory work into the bargain than water-colours.
The materials required comprise ordinary oil-colours in tubes, of which the following are perhaps the most useful that can be employed for the purpose:
| Italian Pink. | Prussian Blue. | Rose Madder. |
| Raw Sienna. | Indigo. | Purple Madder. |
| Yellow Lake. | Neutral Tint. | Crimson Lake. |
| Chinese Orange. | McGilp. | Burnt Sienna. |
| Brown Pink. | Brown Madder. | Ivory Black. |
It is curious to observe that the suitability of these colours for the particular purpose of glass-painting varies with the method of manufacture. I find by experience that one maker’s Prussian blue is better than another’s, while for a suitable crimson lake I have to go to quite a different shop, and so on.
The brushes used must be of the best, the majority of them being camel-hair, a few fine sables being kept for special touches. It is also necessary to provide some good large bushy camel-hair brushes to be used as softeners.
A flat porcelain palette is better than one of[Pg 46] any other material, for the strength of the tints is seen well, and the surface can easily be cleaned with a little turpentine. A flexible palette knife must also be provided.
Dabbers to soften down skies and other flat masses of colour can be made by wrapping a ball of cotton wool in fine wash-leather. The leather should be first thoroughly washed with soap and water, and it will be better if a little of the soap be left in it as it dries, for this renders it soft and pliant. Both dabbers and brushes should be kept in a dust-tight box, for dust is the greatest enemy of the slide-painter.
It will be noticed that the list of colours given includes those only which are transparent, many others used in ordinary oil-painting being omitted. It is obvious that opaque colours like Naples yellow or chrome yellow would simply appear black on the sheet. The tyro who is used to other methods of painting, and has some idea of the harmony of colours, will, of course, have an immense advantage over anyone without artistic knowledge or feeling; and when he has once mastered the technicalities of the new work, will soon be able to produce passable pictures. The list of colours given is necessarily limited for the reason already given, but their number can be increased[Pg 47] indefinitely by judicious blending one with the other. Let me give a few instances.
There is no green in the list given, simply because I do not know of a good transparent one. But various tints of green suitable for foliage can be easily made up with the colours named. Prussian blue mixed with any of the yellows will at once give a crude green, but it will not be suitable for use without the help of some other tint, such as burnt Sienna, or one of the reds. Italian pink and indigo make a fine green. Italian pink, brown madder, and Prussian blue is also another useful combination. Brown pink, indigo, and Vandyke brown will be found admirable for the shadows in foliage; indeed, the combinations for this purpose are endless. Again, there is a difficulty generally found in obtaining any approach to scarlet. The best I know of is a mixture of Italian pink, crimson lake, and Chinese orange. For browns, Vandyke brown, Chinese orange, ivory black, and burnt Sienna, will give any range of tints, from the coldest to the warmest. The reader will soon find by experiment the right proportions for mixing these colours to produce the desired effect, and he will be much assisted in the work by studying any good manual of[Pg 48] water-colour painting. I recommend a water-colour manual in preference to one dealing with oil-colours, because the first deals more with transparent tints, which depend for their effect upon the white ground upon which they are laid. In like manner a lantern picture depends much upon the white surface upon which the tints are subsequently exhibited.
Our first attempt at glass-painting shall be an open landscape with figures in front—and we will suppose that the scene is laid in Britain. This would seem to some an unimportant point, until they remember that the skies and atmospheric effects seen in some other lands would require an altogether different treatment. I once coloured an Egyptian scene for a friend, and he admired my work, with one exception. ‘You have given me an English sky,’ he said. The sky will be the first thing to see to, and we will endeavour to give it a flat tint of blue slightly darker at the zenith than it is at the horizon. We squeeze out from its tube a little Prussian blue upon the palette, and dipping a good-sized camel-hair brush into a small cup of turpentine, we take up a little of the colour and work it about on the palette until it seems of the right strength. Before applying it to the glass we add to it a very small quantity of[Pg 49] McGilp medium. Having mixed this last addition with our brush-load of colour, we can apply it to the glass, painting it in broad bands from side to side until the sky is all striped with blue. If the subject comprises a range of distant hills, let them too partake of the blue tint. When this is done, lay aside the brush and let the coloured glass rest for a minute, so that some of the turpentine will dry off. Now proceed to dab it carefully with one of the leather dabbers. With a very light touch bring the dabber down over and over again, and avoid anything like a rubbing action. The movement must be vertical, and not in the least horizontal. By bearing a little more heavily on the dabber as the horizon is approached, the tint will be sensibly lightened.
When this sky-colour has been uniformly dabbed in we may proceed to put in, or rather wipe out, some cloud effects. A little piece of soft kid wrapped round a pointed pen-holder is a good tool to use for the purpose, but a leather stump will answer the same end. This part of the work requires a little judgment and artistic taste. In a picture full of detail and which only has a small portion of sky exposed, it is best coloured simply blue. But where there is not much detail in the landscape,[Pg 50] as in the case for instance of a mill on a bleak moor, the sky can be worked up with great advantage to the general effect. The clouds are wiped out by a rubbing action combined with a dabbing movement, so that the edges of the clouds formed remain quite soft. If they appear too hard they can be corrected by a few gentle dabs with the top of the finger. Before the leather is laid aside, it may be employed for wiping off any portions of colour which have accidentally been placed where they should not be. But if there is water included in the subject, such as a lake or river, it will when the sky is reflected in it partake of the same colour, and should be dabbed in at the same time.
We must now consider how we are going to treat the rest of our picture. If there is some expanse of foreground it will make the best contrast with the sky if we use a warm sandy colour. Chinese orange, raw Sienna, and brown pink mixed in various proportions to suit the lights and shadows of the picture will give the tint required. At this stage, too, the middle tints of the composition lying between the sky and the foreground can also be laid in. These will mostly consist of subdued greys, made up of Prussian blue, burnt Sienna, purple madder, and crimson lake. When[Pg 51] these tints are all dabbed in, and the whole picture has been carefully gone over with the leather point, so as to remove truant colour, the slide may be laid aside to dry. I find it a good plan to have a tin box containing grooves for this purpose. The slides when grounded in in the way just described are placed in the grooves, and the open box is turned towards a fire. In an hour or so the colours are dry enough for further treatment.
We can now once more view our work on the easel, and most probably we shall see much to amend. The trees in the middle distance are too yellow, or too blue. They are easily corrected by a touch of the tint in which they fail. But at this stage of the painting we must use a different medium for our colours. We have done with dabbing, and must now lay the colours on as smoothly as possible with the brush alone. Canada balsam in turpentine, of the consistence of very thin varnish, is perhaps the best medium to use. It should be mixed with every colour as it is taken upon the brush.
The beginner will find some difficulty at first, particularly if oil-colours are new to him, in keeping his brushes in order. He need not have a brush for every tint. Let one be kept for skies, but only two or three others are[Pg 52] necessary. When I commence to paint a batch of pictures I put on my table, after carefully dusting it all over with a damp cloth, a sheet of newspaper. In the centre stands my easel. On the left hand my colour-box, and on the right my palette. Close to the palette is placed a double thickness of clean white tissue paper, and a small pot of turpentine. When I wish to clean my brush, it is simply dipped in turpentine, and drawn over the surface of the white paper until I see that it leaves no trail of colour. By this simple means one brush can be used for any number of tints, for the cleansing of it does not occupy more than ten seconds.
It is in the foreground of a picture that the artist must be lavish with his bright colours. If the figures in the subject will allow of bright colouring, so much the better; but it must be remembered that if these colours are not put in with some regard to contrast, their effect is much diminished, if not altogether lost. Let the painter remember that the principal colours have their complementary colours, and that wherever we can place one of these tints against its complementary, we are bound to have harmony. Thus the complementary of blue is orange; of red, green; and of yellow, purple. But for further particulars[Pg 53] of this nature, the aforesaid ‘Manual of Water-Colours’ must be studied.
When the picture is apparently finished, it will, most likely, require some finishing-touches. And here a new tool comes into use, namely, the etching-needle. Take a pointed piece of wood, about the size of a penholder, and bind upon it, by means of waxed thread, a good strong sewing-needle, leaving not more than a quarter of an inch of the point exposed. A few judicious touches with this needle will make a vast difference in the effect of a picture, but anything like coarse scratching must be avoided. The beginner will do well to view his work in the lantern as it gradually progresses, for what may look very well on the easel, will look very different when all its imperfections are magnified on the screen. The art of slide-painting is one which requires constant care and practice before anything like proficiency is attained.
In case some of my readers should be well acquainted with the use of water-colours, and may be deterred from trying the art of glass-painting because oils only are recommended for the work, I will briefly describe how water-colours are utilized for slide-painting. At the same time, I hold to my previously[Pg 54] expressed opinion, that oil-colours are the more suitable pigments to use.
The varnished surface of a glass picture does not take kindly to water-colour, and as the brush is applied to it there is a repellent action which would make the painter despair if some means were not at hand to obviate the difficulty. By mixing each colour with a certain proportion of prepared ox-gall the difficulty vanishes, and it is a wise precaution to rub a little ox-gall and water over the surface of the picture by means of a tuft of cotton wool, before any colour is applied at all.
The same transparent colours as those recommended for oil-painting may be employed, besides a few more transparent tints which are commonly not ground up in oil. But the dabbers are of a different description. Procure two or three good thick camel-hair brushes, and cut the hair off straight with a pair of scissors, so as to leave the ends of the hairs like a flat stump. Now carefully turn the brush round and round in the flame of a spirit lamp, or candle, so as to just singe the point of each hair. When this is done, rub the ends of the hair on the finest glass-paper until every trace of singeing has disappeared. This treatment will leave the brush with a[Pg 55] flat woolly head like a mop, which makes an excellent dabber.
When the sky-colour has been applied as evenly as possible, and has been allowed to dry, the surface may be worked over with the dabber. But, before doing this, gently breathe over the colour. The dabber will remove little particles of the pigment, and will reduce the general strength of the tint, so that this loss should be provided for when the colour is first applied. Clouds, etc., can be wiped out with the leather, after the breathing operation, and in many other respects the two modes of colouring agree.
When the general tints have been laid in, the colours may receive a coat of mastic varnish, and this again can be worked over with colour to strengthen those tints which may require it. The varnish also confers a transparency upon the tints that they do not possess without it.
[Pg 56]
Those who are familiar with the working of the microscope know that the objects which are employed in that instrument can be viewed in two different ways. Transparent preparations have the light thrown through them by means of the adjustable mirror beneath the stage. Opaque objects, on the other hand, must have light thrown upon them from above, and this is managed by means of a separate condensing lens. For the magic lantern, transparent pictures are almost wholly employed; but there is a means of utilizing paper prints, photographic cartes de visite, and a certain limited number of solid objects, so that they may be shown in an enlarged form on the sheet. The effect is not so bright as when transparencies are employed, for a large proportion of the available light is absorbed in the operation; but there are many who would sacrifice a good deal in the way of effect, for the undoubted advantage of being able to utilize the contents of their albums, etc.
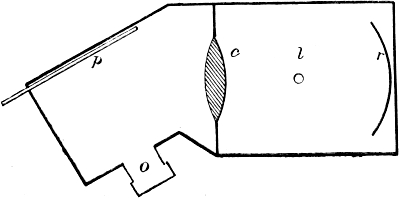
Fig. 8. Ground-plan of Chadburn’s Opaque Lantern.
p, Picture; c, Condenser; l, Light; r, Reflector;
o, Objective.
The first instrument which was constructed to accomplish this end is known as Chadburn’s lantern; and, as will be seen from the [Pg 57]annexed diagram, it differs very much from the ordinary form of magic lantern. From what has been already said concerning the loss of light, it will be evident that a powerful luminant is a matter of prime consideration. A good oil-lantern will do the work—but not so well as the lime-jet. The luminous face of the lime, instead of being turned towards the optical system, is opposite a concave reflector placed at the back of the lantern. From this the light is reflected towards the condenser, which condenser concentrates the light obliquely upon the object. The picture or object is contained in a kind of box joined to the main lantern, and which holds immediately opposite the illuminated picture the lens for projecting its image upon the screen.[Pg 58] This pioneer form of opaque lantern has been superseded by the instrument called the Aphengescope. This can be purchased now of most opticians. Virtually it consists of the front chamber of Chadburn’s lantern constructed to fit on to the front of any ordinary oil or lime-lit lantern.
The aphengescope can be used for showing woodcuts, paper photographs, printed and written matter of any kind, so long as the space covered is within the size of the instrument. Thus any caricatures from our comic publications could be pasted on card, and enlarged by its means. But it will be readily observed that this class of subjects, if photographed as transparent positives and used in the ordinary lantern, can be shown far better. The principal use of the aphengescope is to show solid objects which cannot by any possibility be shown enlarged without its help.
Let us suppose, for instance, that it is desired by some collector to show his friends a cabinet of coins and medals. Such objects are so bright in themselves that they are admirably adapted to this instrument. Their form, colour, and minute markings are faithfully reproduced; whilst the raised portions catch the reflected light in such a way as to[Pg 59] make the images look as solid as the objects themselves. At the Polytechnic Institution, a lecture upon the invention of the watch, and its gradual development, was beautifully illustrated by the opaque lantern. First came the different parts of the watch, and then the varied movements. It was most curious and instructive to see the wheels and springs all in movement upon the screen.
There are also many natural things which can be shown by the same means. A freshly opened oyster makes a very remarkable object. A still more curious effect is obtained by concentrating the light upon a freshly cut orange or lemon. When the fruit is squeezed, the pips and juice appear to fly upwards; for, of course, everything is shown upside down, as in the ordinary lantern. The opaque lantern was once introduced into a court of law in America, as a witness for the prosecution in a case of forgery. The following is a condensed account of the occurrence, taken from a New York paper:
‘During the recent trial, it became necessary to show the differences between a genuine signature and an imitation or forgery of the same. For this purpose, there was brought into court a powerful reflecting magic lantern. The room was darkened, and images of the[Pg 60] two signatures, enormously magnified, were thrown side by side upon a screen before the judge and jury. The false signature was at once revealed. The illumination of the writing was effected by means of two powerful lime-lights contained within the lantern. The peculiar arrangement of the lights and screen enables the examiner to discover the surface of the paper through the ink, so that patching, shading, or painting of letters becomes evident the instant it is brought under the focus of the lantern. An arrangement of screens, by which the light is cut off alternately from either side of the instrument, discovers any tampering with the surface of the paper, either by scratching or washing by chemicals. (In other words, by throwing the light alternately from either side, the relief caused by the grain of the paper is clearly shown; and any tampering with that relief, by scratching or otherwise, at once becomes apparent.) The instrument, in this case, was of sufficient capacity to view at once two bank-notes placed side by side, and the pictures were of such fineness that there was no difficulty in viewing their smallest details. I fear that the introduction of a magic lantern into an English court of law would be rather too sensational for the ordinary legal mind—particularly as the evidence of an[Pg 61] expert, with the help of a microscope, would answer the same end.
Under the name of the Physioscope, an immense opaque lantern was exhibited some years back in London. The object magnified on the sheet was the human face, and a correcting lens was included in the apparatus, so that the face was seen right way up. It was always rather an unhappy face, for the individual who lent his countenance to the transaction had on either side of him, and within a few inches of his cheeks, a very powerful lime-light, the heat and glare from which were sufficient to render anyone uncomfortable who was not a salamander.
Of late years it has become possible to take very beautiful photographs of microscopic objects, which, when used as lantern-slides, give a very fine effect. Numerous slides of this character may now be purchased, which cover a vast field of microscopic knowledge, and many will be content with what they can thus obtain. But there is another class of workers who, perhaps possessing a large number of microscopic slides, will be glad to utilize them for the lantern, so that they are[Pg 62] no longer limited to the individual eye. For these the lantern microscope, which will screw in front of the lantern in place of the usual optical system, is a most useful instrument. Different makers advertise in their catalogues lantern microscopes which range in price from twenty-five shillings to as many guineas. And it recently came to my knowledge that a well-known London optician has undertaken the construction of a few of these instruments at the price of £150 each. The amateur lanternist will, therefore, have some difficulty in deciding what he ought to pay for such an instrument. And it is most difficult to advise him on that point. His best plan is, perhaps, to see for himself what the makers can offer him, and, if possible, to seek a trial of the instrument before he purchases it.
The lantern microscope is a modification of the old solar microscope—an instrument which could be screwed against a hole in the shutter of a darkened room—and which had a mirror outside which projected a beam of sunlight through it. The objective lenses were uncorrected, and small in aperture, so that the instrument was far from being a perfect one. But the intensity of the solar light covered many objectionable features, and[Pg 63] it was possible to get some astonishing effects with the contrivance. But sunlight is such an uncertain commodity in our climate that, when the lime-light came into prominence, the old solar microscope was forgotten in favour of that which depended upon a more constant, if a far less intense, light source.
The great difficulty to overcome in the lantern microscope is to get the light sufficiently intense to well illuminate the objects. The aperture of a microscope objective, even of low power, is so small, that, when the pencil of light which it emits is spread over a screen, the light is so attenuated that the details of the object are difficult to make out. In the near future, when we are promised that electricity shall be laid on to our homes, as gas is now supplied to us, the difficulty will disappear, for the electric-arc light is many times more intense than the most powerful lime-jet.
Having obtained a lantern microscope, the next thing to consider is the class of objects which can best be shown with it. To help the reader in determining this point, I will now give a kind of sketch of a popular lecture to accompany an exhibition of the instrument.
Such a lecture might usefully commence[Pg 64] with a brief description of the microscope: its history, and how, in its improved form, it has opened up a world of minute life, of which our forefathers could have had no conception. We might then put forward a few remarks as to the adaptation of the microscope to the oxyhydrogen lantern, and point out how by its aid a number of persons can at the same time see what, in an ordinary microscope, is visible to only one person. So much by way of introduction.
We might next enlarge upon the circumstance that the contents of the world have been classified into three general divisions—popularly known as the three kingdoms of Nature: the Mineral Kingdom, the Vegetable Kingdom, and the Animal Kingdom. Show how one is dependent upon the other, and the difficulty in many cases of drawing a line to separate the minute organisms of the Animal Kingdom from those of the Vegetable World. Numerous examples from the lower forms of life may be quoted to illustrate this. Now show and explain subjects from each of the three divisions, taking the minerals first. Define a mineral, and show how they crystallize in definite forms. Illustrate the process of crystallization by putting a drop of a saturated solution of sal-ammoniac[Pg 65] on a slip of glass, and spreading it over with a brush. Such a glass placed in the microscope will, as it dries, become covered with branches of crystals, which seem to grow and strike out in various directions on the sheet in a truly marvellous manner. Sections of various minerals may next be shown, finishing with sections of coal. In pointing out the origin of coal from plants, we may easily drift into the next division of our subject—the Vegetable Kingdom.
Here we have indeed a wide field to illustrate. Commencing from the simple cell, as exhibited, for instance, in a bit of so-called green mould, and arriving gradually at sections of different stems of plants (which by the way form most beautiful objects on the screen), sections of different woods, parts of flowers, etc. From these it will be easy to step over the indistinct boundary-line which separates us from the Animal World. Here we can commence with the lowest organisms; next show the living inhabitants of our ponds and ditches. Arrive at the Insect World, and show the generally unfamiliar parts of familiar insects—bees, wasps, flies, etc. We can then go higher, and exhibit sections of bone, hair, etc.; finishing with the structure of the human body, so far as it can be indicated by[Pg 66] means of the microscope. This is a brief sketch of the kind of entertainment the microscope is able to afford, which can be modified to suit the views of the exhibitor.
The most common form of moveable slide is that known as a ‘comic slip.’ This mechanical contrivance for the amusement of youth is generally of the coarsest execution, and it speaks little for the originality of our slide-producers that the same old things should appear in catalogues year after year with no improvement. The ‘comic slip’ consists of a glass in a wooden frame, with another loose piece of glass which can work backwards and forwards in front of it. This movable glass generally serves as a mere screen to cover something painted underneath it, and it is rubbed over with black varnish so as to be opaque. Thus a gentleman is represented with a nose of the normal size, but as the screen is withdrawn it elongates to an awful extent. Or a woman’s tongue may be graphically, if not elegantly, portrayed in the same manner.
In another class of slide a circular glass is[Pg 67] kept in slow rotation in front of the slide proper by means of a rack-work attachment. A common design for this device is a landscape with a windmill in the centre. The sails of the mill are painted on the revolving glass, and can be kept in rotation as long as desired. The chromatrope effect is managed in the same way, only that in this case both glasses are caused to slowly revolve in reverse directions. There are many people who admire chromatropes, and many others who regard them as rather trying to the eyes. Rippling water, the rising or setting of the sun or moon, and astronomical slides illustrative of the movements of the heavenly bodies, are among the subjects which can be well illustrated by mechanical means.
Perhaps the cleverest piece of apparatus ever invented to give the effect of movement by means of a magic lantern is Beale’s choreutoscope. This instrument depends upon the well-known phenomenon common to our eyes, called persistence of vision. The image of anything that we look at is cast upon the retina at the back of the eye by the agency of the crystalline lens, which is placed behind the pupil. So far, the human eye resembles a camera obscura. Persistence of vision means that an image so cast upon the retina remains[Pg 68] impressed there for about the eighth part of a second. For this reason we wink continually without knowing it, for the light impression remains with us during the short time that the eye is closed in accomplishing that necessary action. A burnt stick with a red-hot end whirled round and round appears to us like an unbroken circle of fire. The separate drops of rain as they fall from the sky look like streaks of water, and so an artist will represent them in his picture. A quickly moving meteor looks like a long trail of fire for the same reason.
In the choreutoscope we have a very elegant adaptation of the same principle. It consists, in its commercial form, of a slide arrangement that can be placed in any lantern. This contains a narrow strip of glass, with, say, six figures painted upon it, each figure having a different position. A dancing man is a good representative of the rest. By a turn of a handle each figure is brought into view successively, but so rapidly as to give the effect of moving arms and legs. An interceptor or screen runs in front of each figure as the change occurs.
One of the best designs made for this instrument is a dancing skeleton (see annexed cut). In this case the figures are cut stencil-fashion[Pg 69] out of very thin brass, and the openings thus cut transmit so much light that the effect is far more brilliant than if the design were executed on glass in the usual manner. The choreutoscope is not only a most amusing contrivance, but it illustrates in a very beautiful manner this optical law called ‘persistence of vision.’
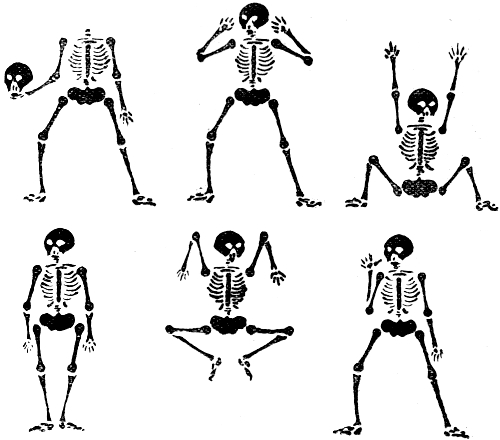
Fig. 9.
Facsimile of a dancing skeleton for Beale’s Choreutoscope.
[Pg 70]
The best lantern and the best pictures will not interest an audience unless the entertainer or lecturer is up to his work, and the matter which he conveys is skilfully put together. I believe that lecturing would be far more popular among us had it not been for the numbers of utterly incompetent men who have in past years bored audiences to such an extent that the word ‘lecture’ is to them as a red rag is to a bull. When I say incompetent men, I do not mean uneducated ones; but I mean those who from natural want of voice, and utter ignorance of its management, are generally unfit for public speaking. It seems to be too often conceded that because a man has written a book—or done something else which has brought him before public notice—he is, without any previous knowledge or practice, fit to lecture on the particular subject with which his name is identified. Or his claims to recognition as a lecturer are based upon certain cabalistic letters after his name, which in many cases represent only so many guineas yearly subscribed to those who confer them. Lecturing is an art that can only be acquired successfully by those who have certain qualifications[Pg 71] for the work, and among these the foremost is the power of imparting knowledge to others in a common-sense and interesting manner. Luckily for him, the amateur lecturer is likely to meet with a far more indulgent audience than those which professional men have occasionally to face; but this is no reason why he should be careless as to his method of delivery, or of the matter delivered. Perhaps the er—worst fault er—which a lecturer can er—fall into—is the one indicated er—in this sentence. ‘To err is human,’ in a wider sense, unfortunately, than Pope, the writer of that well-known line, ever dreamt of. Unless a would-be lecturer can conquer this tiresome habit, or any other trick of speech which he may have cultivated, by all means let him confine himself to the management of the lantern while some one else acts as showman.
If two people are thus managing an exhibition between them, and if the room be large, so that they are widely separated, some signal from the lecturer to indicate that he wants the next picture thrown on the screen becomes necessary. A bell, or anything that makes a noise, is distracting both to lecturer and audience. Still worse are verbal instructions from one to the other. I myself use an electric single-stroke bell with the gong removed,[Pg 72] the hammer of which gives a little click unmistakable to the operator, but quite unheard by the audience. Such a bell can be placed close to the lantern, while its push is far away on the lecturer’s desk. Sometimes a string can be carried from lecturer to operator, a gentle pull of which will give the necessary signal. Some lecturers signal by uncovering a little pane of red glass in the back of their reading-lamp. But I think that any sight signal is inadmissible, because the operator has quite enough to do in attending to his duties without having his attention thus distracted. The signal, of whatever nature it be, should be given by the lecturer some seconds before he has finished with the picture in hand, otherwise there is an awkward pause while the operator makes the necessary change. Before the lecture begins, the reader should make himself not only thoroughly familiar with his subject, but should be also familiar with the different pictures which illustrate it. And this especially applies to the common case of those who have purchased or hired a set of slides and a published lantern reading—many of which are compiled by writers of repute, and are in every way excellent. Let him, then, carefully go through the reading beforehand, comparing[Pg 73] each picture with the text, and making himself so familiar with its details that he is afterwards able, during performance, to point out anything to which attention may advantageously be directed. Particularly is this necessary in the case of an introductory map, where places of importance to the subject in hand must be pointed out. The most convenient form of pointer, by the way, is a Japanese fishing-rod, which telescopes into small compass when not in use.
For an evening’s lantern entertainment to be successful, a great deal depends upon the operator. With a mineral-oil lamp in a small room, his duties are not very onerous, for the lamp when once established should require no further attention, except it be to turn down a wick which shows symptoms of smoking. But he should be careful to have in reserve a glass or two to replace the front glass of the combustion-chamber, which may crack through some unexpected draught of air. His slides must all be numbered and in order. They may be each mounted in a wooden frame to fit the lantern stage, or else the lantern may be fitted with a permanent grooved slide in which the glass pictures are placed one after another, the last one pushing out the one before. Another plan, which is a good one to adopt[Pg 74] where a single lantern only is being used, is to make use of what is called a panoramic slide. It is constructed like the one just described, only it is furnished with a travelling tape upon which each picture rests. The turn of a handle moves the tape, and the pictures travel forward panorama-fashion.
In the use of a double lantern furnished with lime-jets, there is plenty for two hands to do, for the operator has to keep his attention fixed not only upon the business of changing the pictures, but upon the condition of the lights. As the pressure of the oxygen gas varies as it is gradually consumed, so the supply of the two gases to the jets will want constant adjustment if the maximum quantity of light is expected. Extra weights, too, must be added as the pressure-boards gradually sink down. Beyond carefulness in this respect, the lantern operator must see to the occasional turning of his limes, taking care to do this when the lime wanting attention is not in actual use. He should also find time to wipe the glass of each picture with a leather before putting it in the lantern, for a film of moisture condenses on the surface, particularly in a room full of people.
The success of a lantern entertainment depends nearly as much on the competence of[Pg 75] the assistant as it does on the powers of the lecturer. I am perhaps fastidious on this point, for my lecturing apprenticeship was served at the late Royal Polytechnic Institution, where operators were employed who had spent the best part of their lives in this particular work. It was seldom, indeed, that they made a mistake.
THE END.
BILLING AND SONS, PRINTERS, GUILDFORD.
Transcriber’s Notes:
New original cover art included with this eBook is granted to the public domain.
Variations in spelling and hyphenation are retained.
Perceived typographical errors have been changed.